How to Continue Typing Without Delete Words While
By default, Microsoft Word replaces the selected text when you start typing. However, if you do not want to do that and instead, you want to block Word from removing selected text when typing, here is how you can do that. It is possible to enable or disable this setting using Word Options, Local Group Policy Editor, and Registry Editor.
Let's say that you have selected a text and want to replace it with new words. For that, you do not need to press the Backspace or Delete button after selecting the text in order to remove it. Instead, you can start typing, and the selected text will be replaced automatically. However, if you do not want to do that due to some reason, this guide will be handy for you.
Stop Word from removing or deleting Selected Text as you type
You can make Microsoft Word stop deleting selected text by changing the 'Typing replaces selected text' setting. To allow or block Word from removing selected text when typing, follow these steps:
- Open Microsoft Word on your computer.
- Click on theOptionsmenu.
- Switch to theAdvancedtab.
- Tick theTyping replaces selected textcheckbox to allow.
- Remove the tick to block.
- Click theOKbutton.
To learn more about these steps, continue reading.
To get started, you need to open Microsoft Word first and click on theOptionsmenu visible in the bottom-left corner.
After opening theWord Optionspanel, you need to switch to theAdvancedtab. Here you can find a setting calledTyping replaces selected text.

If you want to allow removing the selected text, tick this checkbox. However, if you do not want to remove the selected text, remove the tick from the corresponding checkbox.
Finally, click theOKbutton to save the change.
How to enable or disable removing selected text when typing in Word
To enable or disable removing selected text when typing in Word, follow these steps:
- PressWin+R to open the Run prompt.
- Type gpedit.m sc and press theOKbutton.
- Navigate toAdvancedinUser Configuration.
- Double-click on theTyping replaces selected textsetting.
- Choose theEnabledoption to allow.
- Choose theDisabledoption to block.
- Click theOKbutton.
Let's check out these steps in detail.
First, you need to open the Local Group Policy Editor. To do that, pressWin+R> typegpedit.msc > press theOKbutton. Then, navigate to this path:
User Configuration > Administrative Templates > Microsoft Word 2016 > Word Options > Advanced
Here you can see a setting calledTyping replaces selected text. You need to double-click on it and select theEnabledoption to allow and theDisabledoption to block removing the selected text while typing in Word.
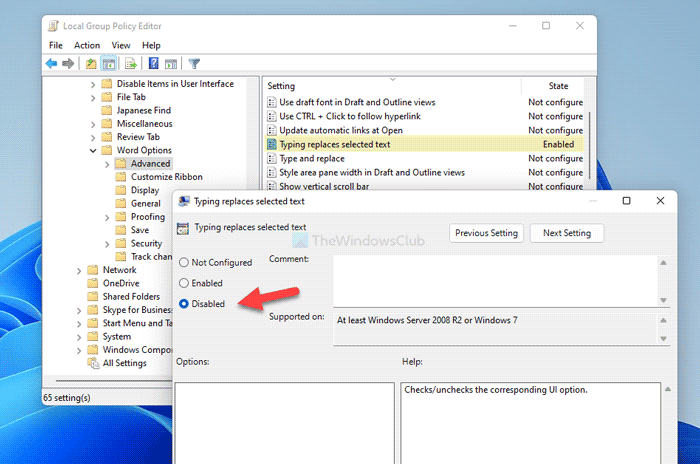
Finally, click theOKbutton to save the change.
How to enable or disable removing selected text when typing in Word using Registry
To enable or disable removing selected text when typing in Word using Registry, follow these steps:
- Search forregedit and click the search result.
- Click theYesbutton.
- Navigate to Microsoft\office\16.0 in HKCU.
- Right-click on0 > New > Key and name it asword.
- Right-click onword > New > Key and name it asoptions.
- Right-click onoptions > New > DWORD (32-bit) Value.
- Name it asautotextdelete.
- Double-click on it to set the Value data.
- Set it as1 to allow and0to block.
- Click theOKbutton and restart PC.
Let's delve into these steps in detail.
For getting started, search forregedit in the Taskbar search box, click on the individual search result, and click theYesbutton in the UAC prompt to open the Registry Editor on your computer.
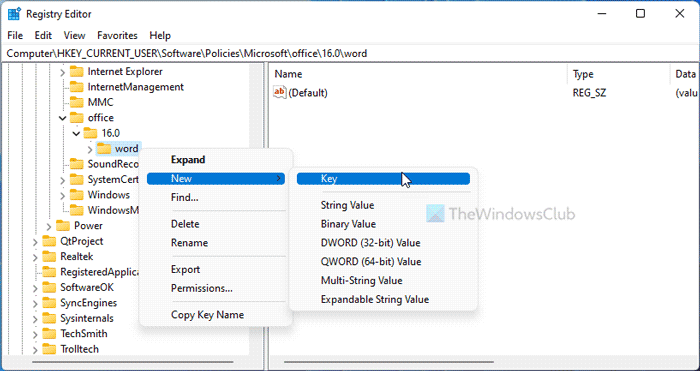
Then, go to this path:
HKEY_CURRENT_USER\Software\Policies\Microsoft\office\16.0
Right-click on16.0 > New > Key and set the name asword. Then, right-click on thewordkey, selectNew > Key, and name it asoptions.
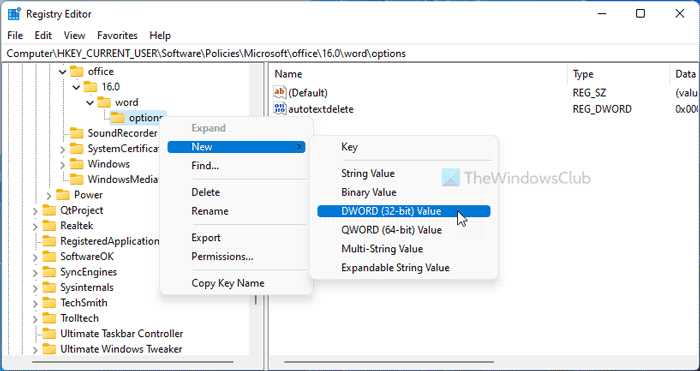
Following that, right-click on theoptionskey, selectNew > DWORD (32-bit) Value and name it asautotextdelete.
By default, it comes with a Value data of 0. If you want to block this setting, keep that Value data. However, if you want to allow Word to remove the selected text, double-click on it and set the Value data as1.
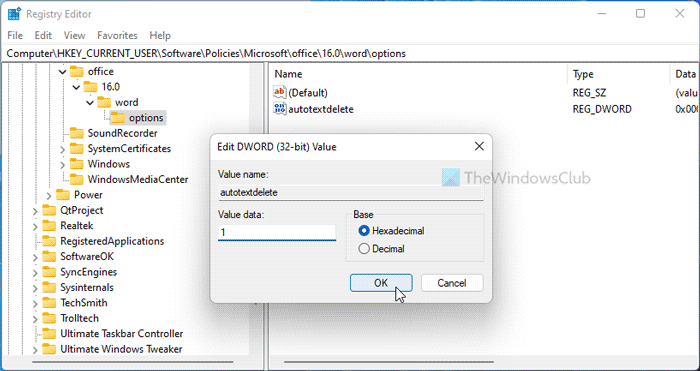
Finally, click theOKbutton and restart your computer to get the change.
Read: How to disable Text Drag and Drop feature in Word and PowerPoint
How do you stop text from overwriting when typing?
To stop Word from overwriting when typing, you need to enable theOvertype mode. For that, open the Word Options and go to theAdvancedtab. Then, find theUse overtype modesetting and tick the corresponding checkbox.
Why is my text deleted when I type?
If Word is deleting text when you type, you need to disable the overtype mode. As said earlier, you can find this setting in the Word Options panel. To turn it on or off, open the Word Options and go to theAdvancedtab. Then, uncheck theUse overtype modeoption and click theOKbutton.
That's all! Hope this guide helped.
Read: How to stop Word from selecting everything.
Source: https://www.thewindowsclub.com/stop-word-from-removing-or-deleting-selected-text-as-you-type
0 Response to "How to Continue Typing Without Delete Words While"
Post a Comment